
finally handing out this very late review because … life 🤷♂️
Anker USB hub Ethernet Port
I had bought the Anker 565 11-in1 USB-C hub because it’s got a good review from a German tech magazine. But at some point it stopped working with its Ethernet port. The LEDs lit up briefly but the network interface didn’t show up in the OS. I tried debugging it for a while and initially thought it is a problem with Apple Silicon Macs because the adapter was working on an older Intel Mac at home. I even contacted Anker support but there were only semi-helpful. At least they were asking for some debugging information and had recommendations on cross checking etc. The adapter normally doesn’t need any drivers to be installed as macOS does contain all needed drivers already.
Eventually I narrowed it down to be an issue with my own machine as the adapter was also working on my son’s M1 MacBook Air. So no problem with the Apple Silicons.
Eventually I found a Reddit entry where people were discussing about Broadcom ethernet chipsets and their drivers. Then it came to me that I also had a specific driver package installed for an older USB-C adapter with ethernet chipset. This one was needed for that particular chip. Apparently that driver captured the device when the Anker USB-C hub was connected and crashed, rendering the ethernet port unusable.
After I deinstalled that driver the Anke USB-C Hub was working fine again with its Ethernet port … 🤷♂️
Token2 keys
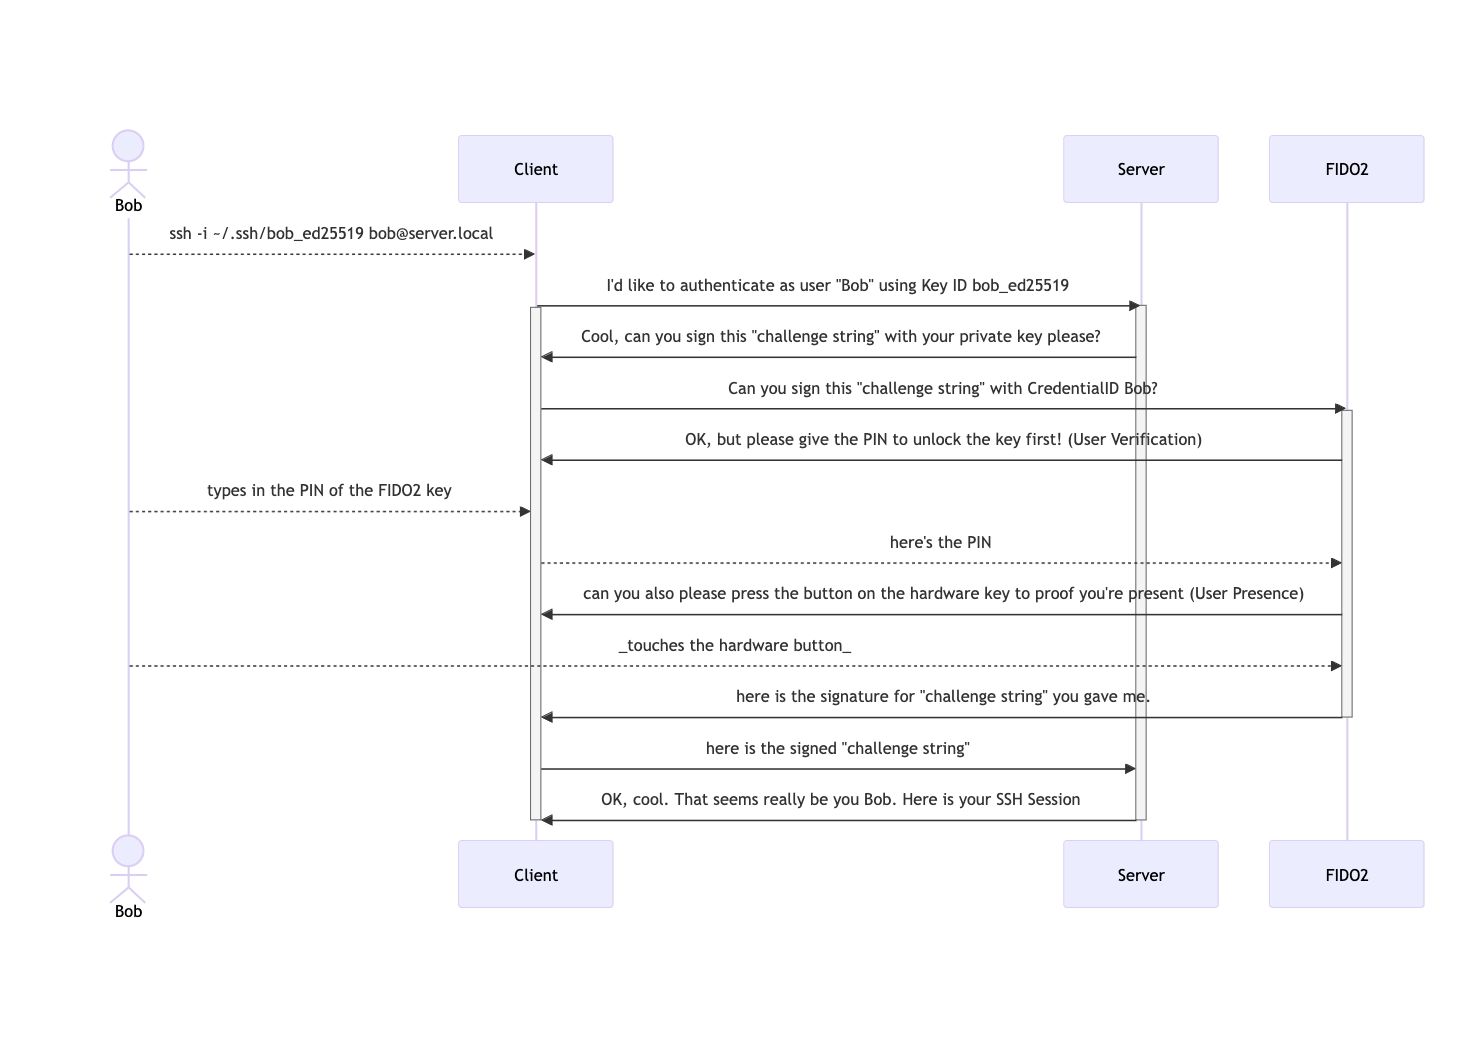
Finally got my Token2 T2F2-PIN+ Release2 Type-C FIDO2, U2F and TOTP Security Key with PIN complexity feature keys delivered and started playing around with them. These are special in the way that each can store up to 300 passkeys. I’ve got two models: one just USB-C and NFC, the other a Dual Port USB-C/USB-A and NFC. They both also work on the iPhone.
First task was to set the PIN on both. on macOS that’s the only use case where I need Google Chrome. This can configure the PIN for security keys via Settings -> Privacy & Security -> Security -> Manage Security Keys -> Create a PIN
One can also manage the individual entries on the security key via that method.
I’m using these hardware keys for Passkey authentication now. To add that physical layer of security over just storing the passkeys in my macOS/iOS Keychain or 1Password.
I use two keys and create all passkeys on both for redundancy in case I’m loosing one of them or they eventually break.
Debian BookWorm override DNS for DHCP Pihole
I’m running a bit of a convoluted network setup on my MacBook because I hate online advertisement. The best ad-blocker I’ve seen seems to be Pi-Hole. This blocks advertisement on DNS level. Means all the ad-sites just don’t resolve in the browser and rather getting a DNS error message rather quickly. That way pages load quickly without the ad and tracking parts and this solution works on all applications. Even non-browsers.
For this to work PiHole has to be your default DNS Resolver. Usually you’d get your DNS resolver via DHCP from your router. And I bet in most cases the router itself is acting as the DNS resolver as it’s the case for most FritzBox routers in Germany.
Now if you roam with your laptop between different networks you’re also switching the DNS resolver frequently. Changing your home DNS resolver to a PiHole in the home network doesn’t help when you’re in the office network or other locations.
So I opted for a Debian linux virtual machine running on my Laptop to do the blocking. I’m using UTM for virtualisation and running the Debian ARM version for performance. However I had to tell the Debian that it should get a DHCP address from hosts network stack but ignore the DNS resolver and instead use its loopback interface for DNS. This is where the PiHole software would run the DNS resolver.
Debian 12 (Bookwyrm) is using the systemd network manager. That’s why just changing the file /etc/resolv.conf doesn’t solve the problem. One has to create a file in /etc/systemd/network/ and name it like <interfacename>.network (e.q. enp0s1.network) with the following contents
[Match]
Name=enp*

[Network]
DHCP=yes
DNS=127.0.0.1
As you can guess … these settings apply for all interfaces matching the Name pattern, telling systemd to do DHCP but use 127.0.0.1 as the DNS resolver and ignore the DHCP provided resolvers.
My macOS then got a special network location profile which is also using DHCP in general, but overriding the DNS resolver (I don’t know why it’s always called “DNS Server” in most settings… thats not a DNS Server but a DNS Resolver!!! ) to point to the PiHole virtual machine (which is always getting the same IP address from UTM)
